January 31, 2010

DIY: Marbled Wall Tiles

Our little house is sadly lacking in decor. It's kind of pathetic really. But having little ones means not much time for decorating, so I have an excuse (right?). We moved in shortly before Duder was born. But! This week I did a little experimenting with some canvas tiles, paint and paper and came up with this:


Whatcha think? I love them! We don't have a headboard yet (or... a bed frame at all actually. It's coming.). But this seemed to add enough over the bed to make the room feel a little less empty. I'm very happy with the way they turned out. I tried about three different things to get them how I wanted in my head and I'm really surprised it worked.


Here's how I did it, just in case you want your own personalized wall tiles.

 
Start out with canvas art squares. The size I used was 8x8. You'll need as many as the number of letters in your word/saying. 
 

Now, I have to tell you that I have no artistic talent what-so-ever. I'm just not artsy. So instead of attempting some kind of watercolor technique, I got a little ... "creative". Wet a paper towel and wring it out so that it isn't drenched, but it's still pretty damp. A few drips coming off is good. Then place it over the canvas. It doesn't need to me pretty. In fact, the more wrinkles the better.

Paint over the wet paper towel with the craft acrylic color of your choice. Mine was black. It helps if you wet the brush with water first, to help with the water color effect. Put as much or as little paint as you want. Less = lighter color, more = darker.

 
Once you're done painting let it sit for about 5 minutes. Then lift off the paper towel. It won't look that great at first. Using either the painted towel (if you want more color) or a clean and slightly damp towel (if you want to remove some color), blot around on the surface. Just go until you think it looks pretty good. As it dries it will soak into the canvas and the colors will bleed, giving more of a water colored/marbled look rather than blotchy chunks of color. Just be patient.
 
 
While the squares dry, open up some kind of text editor that lets you change fonts. Change the print margins to the smallest they can go. Type a letter, pick a font and color you want, then blow it up to as large as it can go. Print out a test page to make sure your letter will fit on the canvas. If you like it, then type out all your letters and print them. Cut them out (forgot to take a picture of that part).

 
Glue one letter on each square (after it's dried of course). I used white glue, worked just fine. Paint the edges if you'd like for a finished look. If you want a shiny look, or you want to seal it you can cover the whole thing with Mod Podge. I just left ours as is. With a level and some nails, hang on the wall, step back, and admire your creation!

I think these would be adorable with some fun colors in a kid's room displaying their name or a fun saying. I think I might make some for the kitchen saying "Eat" or "Feast".

January 29, 2010

Favorite Thing Friday: Clothespins!

 
This is probably one of my weirder posts. Some of you are probably thinking "What the heck? Clothespins??" Well, I have to admit... I love clothespins. They're so versatile! We use them for everything around here. I've used them to not only hang clothes, but we also use them for holding chip bags closed (no need for fancy "chip clips"), I've used them to hold up the boys' pants and also to clip towels behind necks when I'm cutting hair. I'm planning on gluing magnets to the back of a few to hang on the fridge for holding things. They also work in a pinch (pun intended) if you run out of paper clips. I think they're just great for so many things! And since you can get a bajillion in a package for around 2 bucks or less, they're totally worth it.

January 28, 2010

FINISHED!!

I have been thinking for awhile about merging my knit blog with this one, and just having every bit of my life in one, convenient location. I had just been waiting for a post about knitting to actually do that. And now... now I have something for you.

Those who know me are aware that I have been knitting a Christmas Tree Skirt (CTS). I have been knitting it for way. too. long. (Like, 2 years too long). Every year (around Christmas) I decided I was going to finish it. And every year gift knitting got in the way, or I really just wanted to knit something else because... Well. I hated the CTS. Hated it with a passion. It has been the bane of my existence since December of 2007. I don't know why I hated it. I just did. The same thing happened this last year. I didn't finish. But this time I decided that I wasn't going to knit anything else until I finished this stupid thing.

Well, my darling readers, I am SO happy to tell you that I have FINISHED it! It's DONE! No more shall I have to cross a cable. No more shall I spend 15 minutes or longer to knit one stinkin' row (the bind off took 45. 45 MINUTES!). No longer will I see red and start to cry! No more!


Project monogamy is very difficult for me. I like having a bunch of things on the needles. I like being able to take my pick of something to do. My hands are happier that way - I learned that this much acrylic makes my hands hurt. So not starting anything else until this thing was done was incredibly good motivation for me. Now I am done (aside from blocking and weaving in ends), and now I can move on. 


I used the Christmas Tree Skirt pattern by Ann V. Gallentine, but I changed it up a little bit. I changed it to work all as one piece instead of having to sew it up at the end since I hate sewing up. I also changed the cables to be mirrored on each side of a section rather than the same.

Yarn: Red Heart Super Saver  in "0319 Cheery Red" ~ 6 ish balls (I think. Something like that.)

Needles: US 8/ 5mm Susan Bates circulars

One of my unofficial knitting goals/resolutions this year is to see just how many miles I can knit. I started a new ball the beginning of January and it took me an additional ball and 15 yards of a third to finish the CTS.

YTD miles for 2010: 0.42


Now I can start everything ELSE I've been wanting to knit for the past 2 months. :D


January 27, 2010

Goodwill Hunting

I have been LOVING Goodwill lately. It's a new thing for me. Goodwill isn't something my family "did" as I was growing up. But when life changes and the budget is tight your perspective becomes different. And now I have found a new thing I greatly enjoy. It's like the coolest treasure hunt ever. Made more exciting by the thrill of snagging something before someone else can (and the possibility of fighting to the death!).

Ben and I went to one of the stores on Saturday while we were out on a date (dates for us include Home Depot and furniture stores. Aren't we exciting? Heh.). We scored two wall clocks for the house and found some other cool things, but didn't get them. One of the things we found were some gorgeous Denmark/Copenhagen collectors plates. We stood and stared at them, but ultimately left without getting them.

And then I sat. And thought about them. The rest of the weekend. So Monday I ventured back to land of treasures hoping desperately that they were still there.

 
They were! There were four, and I snatched them all up. Each has a different scene, but is the same style. I LURVE them. They will be hung above the kitchen cabinets once I get hangers for them. But that's not all! *cheesy salesman voice* Wanna see what ELSE I got?


Six of the most adorable tea cups. I have a few different ideas for them and I can't decide which to do. Leave them as decoration by hanging them or arranging them (probably just like that). Use them as decorative planters to put a little herb garden in (leaning toward this option). Or just leave them as is and use them for tea. What do you think?

I love little clamp jars like this. There's something about them just seems to send me back to a time before. I found each of these in a different place at Goodwill and I was so excited with each one. I have four all together (as you can see). They're about two inches tall and I think they're the cutest things ever. I'm going to fill them with various things and use them as decoration.


I debated getting this for a long time. Seriously, like 10 minutes just standing there looking at it. I thought it was adorable but wasn't sure about it. Now I'm so glad I got it! I had to do a little rearranging by moving the phone down about a foot. But now it sits perfectly - and level! Go me! - on the wall in our kitchen and holds our mail keys, out going mail, phone numbers, etc. Ben thinks it's cool too, so that was a major bonus. ;)

I have some other things as well, but I'll share those when I'm done with them.

So, anyone else had any awesome thrift finds lately?


January 26, 2010

Life Around Here


It's Talk To Me Tuesday over on Tipjunkie.com and she wants to know all about your To-Do lists and schedules. So I figured I would join in the fun and share a little bit of how life works here in our world.

As you guys have seen before, I'm a wee bit anal. I like things to be organized. And though I don't always have a list written down, I have a general list of what needs to be done in my head. I'll start off with a typical day and then go through my usual weekly schedule.

A normal day for us starts with Ben and I getting up around 6:00. I'll make breakfast for him while he makes his coffee, then we'll watch the news together before he leaves for work. Then I have about an hour or so to check email, read blogs, and have some quiet alone time before the munchkins are up.

Most days are pretty much the same in that the boys will munch on breakfast while they sort of watch PBS or a movie and play with toys. Then it's nap/quiet time (yeah right. Like they actually sleep) at 11 and I'll either use this time to clean or relax (or take a nap if I'm super lucky!). They're usually up around 1 so we have lunch then and they will play and run around - no TV after nap time. Some days we will color with crayons and paper and work on recognizing colors.

Ben gets home in late afternoon so we do a quick tidy up about a half hour before that time. Then I start dinner so we can eat around 5:30/6:00. We'll all hang out in the office during various things until the boys go to bed at 7:00 and then it is Ben and I's time to be together and relax. That's pretty much it!

My weekly schedule is where my "list" comes in:

Monday: Laundry and major cleaning (bathrooms, vacuuming, kitchen). Usually bread baking for the week as well.
Tuesday: Any laundry or cleaning leftovers from Monday. Trash gets emptied and fridge gets cleaned out since trash comes early Wednesday.
Wednesday: Bible study & kid play day at mom-in-laws house in the afternoon.
Thursday: Go over the grocery flyers to make a list, then drag my brother along with me to the store since he's here on Thursdays and I use him as the "big strong man" to do the lifting and help with kid-wranglin'.
Friday: Craft Day! I spend this day for me. It's a good time for me to recharge so I'll spend it either knitting (for the most part) or some other crafty thing that needs a lot of time.
Weekend: Weekends are usually house project days. Usually that consists of Ben and a major project and me watching or keeping the kids out of his way.

My schedule's not that rigid. I have a basic outline and then what gets done gets done. If not then oh well, there's always another day. Funny how having kids - who totally don't believe in schedules - make you loosen up. I've been trying to stick in more crafty things throughout the week as we're slowly beginning to decorate. I thought about going into my "food system" and how I shop and do meal stuff, but I think that will be a different post.

Head on over to Tip Junkie and share your schedule if you're up for it!

January 25, 2010

Menu Plan Monday

Since I've gotten feedback that the menus are liked, I think I shall start posting them every Monday. It would have been the fourth and final week of the eat from the pantry/freezer challenge, but we broke down and went to the store because Ben asked if we could go. Since he's not all that excited when we go grocery shopping then I knew it was a big deal that he was asking. So we went and we stocked up. It was nice to do the challenge though as I learned a lot of things. I'll share more in a later post. My menu sheet starts on Sunday and runs to Saturday so here's what I have for this week's menu including yesterday.

Sunday - Beer Mac & Cheese with Ham (If there's an interest I'll get this recipe up)
Monday - Red Beans & Rice - Now cheaper! See post for details.
Tuesday - Leftover Beans (Ben REALLY likes them)
Wednesday - Crock Pot Chicken
Thursday - Leftover mac or beans
Friday - Chicken Pizza  - with leftovers from Wednesday
Saturday - TBD

HouseWorks: Garden Beginnings

This year we want a big garden. BIG. Like, ridiculous-up-to-our-eyeballs-in-plants big. Well, OK maybe that's just me. I LOVE plants, and plants that give me food are even better. We had a very sad attempt at container gardening at our apartment one year. It wasn't the plants' fault... I just forgot to water them. They were out on the sad excuse for a back porch in an area we never really looked at. Add in the fact that we didn't have a drip system and it was just too hot on some days to go out and water... Needless to say, everything shriveled up and died.


This year we're trying again. Now we have an area where they will be paid attention to and Ben has been talking about setting up a drip system for everything once it's planted. My grandmother (who is a planting queen) has said that, for our area, now is the time to get things started inside. So that's what we did yesterday. Or rather, Ben started it and I took pictures.

We're using recycled containers to start our garden this year (plus the one in the window which is from the 99 cent store). It's a heck of a lot cheaper than going out and buying fancy containers to start everything in. So here's how we did it.


I bought eggs at FoodMaxx awhile ago and they come in Styrofoam cartons. I saved them for this purpose. You won't want to use the cardboard ones because they'll just deteriorate from the water. Cut the lid from the bottom. Don't throw the lid away. You can place it under the carton as a tray to catch water.
Next poke holes in the bottom of each "bubble" using some sort of poky device. I used a knife and just twisted it a little as I pulled it out to open the hole. This is for drainage.


Fill the cartons with dirt (or watch as your hubby does it). We used whatever was in the green tubs that my grandmother gave us for our original garden attempt. I think it's potting soil.

 As you can see in the top picture I have three cartons. Two will be tomatoes. The other one is jalapenos.


Plant the seeds according to the depth it calls for on the package. In our case, it was 1/8 inch. Just eyeball it. Then give them a spritz with water. Just enough to moisten the dirt, don't drown them. I used the spray bottle I keep around to block my knitting. It was the easiest way to water without washing everything away.

There you go! Stick them somewhere they will get sun. We have an old dresser we put in the garage under the lone window for Ben's work bench. He cleared that off and it is now our garden bench.

 This is our onion. One from the bag we bought (for eating) was making a desperate attempt to avoid consumption. So I asked Ben if we could plant it. We stuck it in one of the coffee tubs that we saved and put him in the same window. That was about a month ago and he's been going CRAZY. Apparently he loves it. Every now and then we'll break off some greens for eating. I am planning on hacking him back pretty soon and drying the greens for later use. 

That little container on the window sill is where I planted cilantro. I have a twin container on the kitchen window sill that holds our mint plant. I'm also planning on planting lettuce, basil, bell peppers, garlic, green beans, broccoli, and potatoes. Hopefully. I can't wait until we have a kitchen full of home grown produce!

January 24, 2010

Sometimes Club Stores Are Useful

We try not to shop at Vons. It's really expensive, even with the club card. We'll run in for emergency stuff if we have to, but for the most part we shop at Foodsco and other places that are cheaper. But this week when I got the grocery flyers I saw a really awesome deal on ground beef. How awesome?

99 freakin' cents a pound awesome! So I decided going over budget was alright if it meant I could stock up with such a good deal. I got about 18 pounds and paid $18.09. As you can see, the full price would have been ridiculous (at least to me) but this is a total score. I am even thinking about going back and getting more while it's still on sale.


I bagged it all up into one pound servings and popped them into my freezer. This should last us quite awhile.

Getting deals like this had made me think more about the grocery budget and sticking to it. I should stop beating myself up if we go over a little. I guess it all evens out eventually since now I won't have to buy ground beef for awhile. As long as it's still under control then a "ball park" is OK.

January 22, 2010

Favorite Thing Friday: Tea!


This week must have been crazier than I thought. It's gone by so fast I forgot it was Friday!

This week's Favorite Thing is a cup of hot tea. If anyone ever asked me if there was one thing I couldn't give up, it would be tea (well, after yarn of course). I think the English have it right in saying that a cup of tea can fix anything. There's something so relaxing about sipping the smooth, hot liquid. Tea is how I start my mornings, and sometimes how I finish it. And when I'm particularly stressed out or upset I seem to go make myself a cup without even thinking about it.

I enjoy cold sweet tea during the summer (which is good in it's own right), but there's nothing quite like a steaming cup - with a little sugar and maybe some milk - to calm nerves and make everything right again.


January 20, 2010

Kid Computer Desk

On Saturday my mum and grandmother stopped by to drop off this:

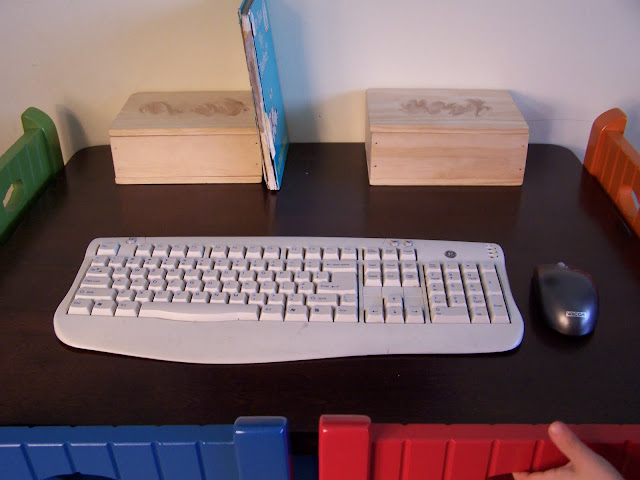
An adorable little kid's table they found at Costco. They said it was an early birthday present for the boys. I think it is the CUTEST thing ever and decided that it would work great in our office. Our office seems to be the main hang out room, so I figured I would make the boys their own desk so they would have a place to "work" while we're in here.


We have an old computer keyboard that Ben yanked the cord out of, and I had a leftover wireless mouse from a drawing tablet that has since been passed on to Ben's brother. I kept thinking they needed a computer screen, so I came up with this.
I made this "screen" by taking a large piece of cardboard and spray painting it black. Then I drew a two inch border around the edge with a ruler and pencil and colored it in with light blue acrylic paint. Add a couple accents with a sharpie and glue on a button for an on/off button and Tada! Instant (well, you know. After the paint dries) computer screen. I just stuck it to the wall with push pens. So now cute little table becomes:


Small people's "work station". Complete with personalized boxes made by Pa. I hadn't even finished putting up the screen when Bubba sat down and started typing. It was so cute. Since then, they have sat and played at the desk while Ben and I are in here. Total success!


January 19, 2010

My Sexy New Bulletin Board

Something about this weather makes me want to be really crafty. Maybe it's the fact that all I can do is sit inside. Usually I take this time to catch up on knitting, but yesterday I had a different craft in mind.

Reading all these blogs about decorating and being crafty has got my crafty juices flowing again. I didn't realized how stifling apartment living was. I used to be really crafty and make things all the time. Then Ben and I got married and it kind of stopped. Then we had kids and it REALLY stopped. But now the bug has bitten again. This is a picture of my bulletin board. Or it was, until about 3:00 yesterday.

Pretty boring, eh? Wanna see what it looks like now?

Pretty darn sexy, don't you think? I am SO happy with it. I keep walking into the office and thinking how nice it looks. Wanna know how I did it? Well you'll just have to keep reading, my darlings.

Take a bulletin board and make sure it's naked. We're going to be painting this so I suggest putting down some sort of workspace protector. Newspaper, old sheets, whatever. I have a big roll of paper that we got from our local newspaper "plant". My mom got it years ago and all you have to do is walk in the front and ask for the remnants of the giant rolls. Got it for free and it's still around. Works great for all kinds of things. But anywaaaays...


You'll need some sort of paint in whatever color you like. I just have the cheap craft stuff. You'll also need a canvas and ribbon.

Paint the edges. It doesn't have to be perfect since the cork board will be covered.


Once it's dry, lay it over the canvas it to use as a template. I had Ben pick up a bit 6' x 9' drop cloth at Home Depot the other day for $10. I plan on making/recovering some pillows with the rest of it. It's alright if the canvas is took big for the board. It's going to get folded over, or you can trim off some if there's really too much. Iron the canvas to get out the wrinkles.

This... This is my new toy I was talking about earlier. I am SO excited to have this. I can do so much with it. Like this!


Fold over a bit of the edge of the canvas as if you were going to hem it, then staple it in place. Do this all the way around, pulling tight and trimming if you need to (like in corners).


Then take the ribbon and, using glue (preferably of the hot variety, but all I had was white. Stop laughing at me.) stick the ribbon all the way around over the staples. This will give a very finished and clean look. 

Hang on the wall and admire your new creation!

Related Posts Plugin for WordPress, Blogger...